If you’re facing issues with your Brother printer or simply want to start fresh with default settings, resetting it to factory settings is a solution that can resolve many problems. In this guide, we’ll walk you through the steps to reset your Brother printer, whether it’s a laser or inkjet model.
Why Reset Your Brother Printer?
There are several reasons why you might want to reset your Brother printer to factory settings:
- Troubleshooting Issues: If your printer is experiencing errors, not printing correctly, or not responding, a reset often resolves these problems.
- Returning to Default Settings: If you’ve configured custom settings and now want to return the printer to its original state, a factory reset is the way to go.
- Preparing for Sale or Transfer: If you plan to sell or give away your printer, resetting ensures that your personal data and custom settings are erased.
- Routine Maintenance: Periodically resetting your printer can help enhance its performance and longevity.
Important Considerations Before Resetting
Before proceeding with the reset process, consider the following:
- Backup Important Data: If your printer stores any documents, make sure to back them up as they may be lost during the reset.
- Cartridge Status: Note the ink or toner cartridge levels. A reset may not affect cartridge levels, but it’s a good practice to check.
- Network Settings: If your printer is connected to a network, you might need to reconfigure network settings after the reset.
- User Manuals: Keep the printer’s user manual handy, as it may contain specific reset instructions for your model.
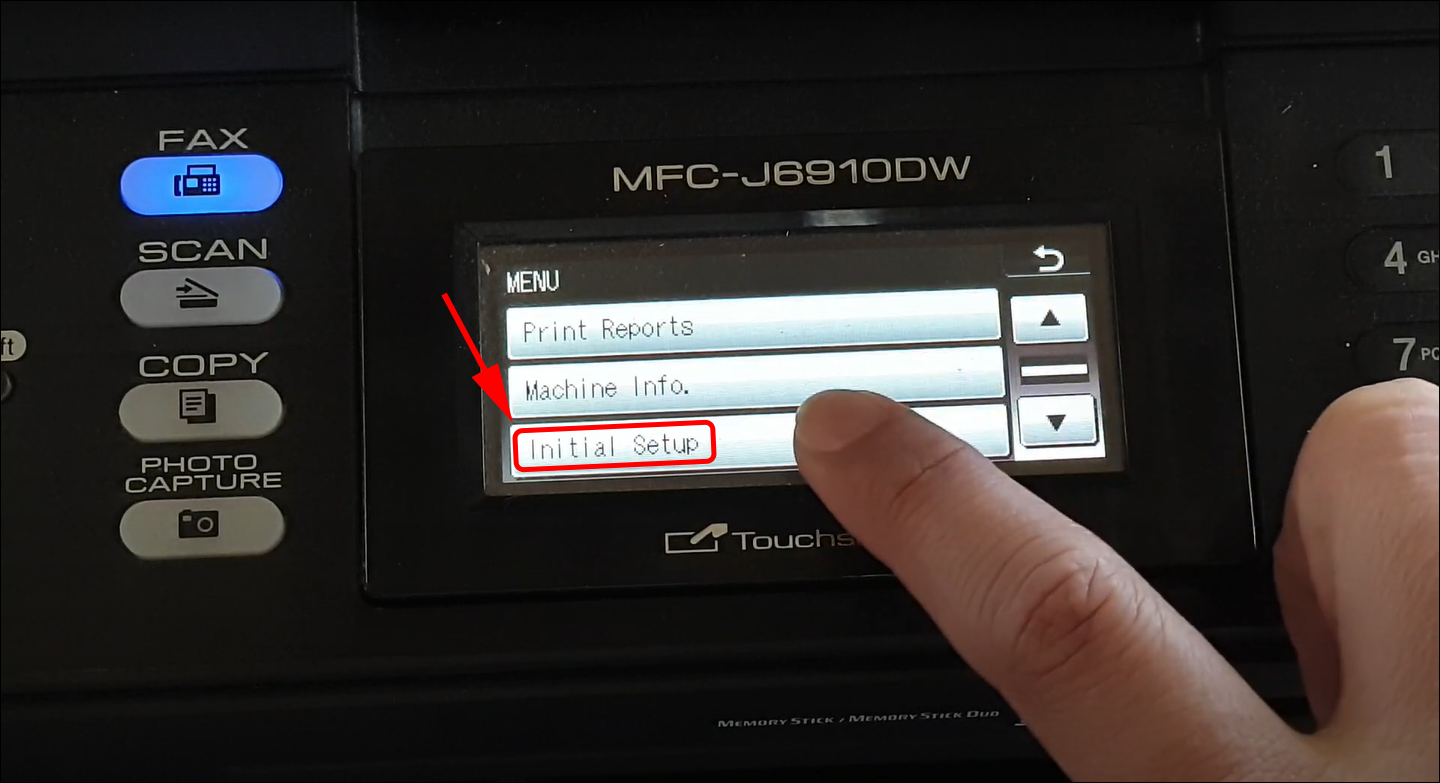
Resetting a Brother Printer to Factory Settings
The process to reset your Brother printer to factory settings may vary depending on the model, but here’s a general guide:
- Power Off: Make sure your printer is powered off. If there’s an ongoing print job, allow it to complete.
- Access Maintenance Mode: To enter maintenance mode, you’ll need to use a specific key sequence. Commonly, this involves pressing and holding certain keys like “Menu,” “*”, and “2” simultaneously while turning the printer on.
- Factory Reset: Once you’re in maintenance mode, use the arrow keys to select “Reset” or “Factory Reset” from the menu, and press the “OK” or “Set” button.
- Confirmation: You may be prompted to confirm the reset. Follow the on-screen instructions to proceed.
- Reconfiguration: After the reset, you’ll need to configure your printer from scratch. This includes selecting your language, date, and time, and any other preferences.
Resetting your Brother printer to its factory or default settings is an effective method for addressing issues, reverting to default configurations, or preparing the printer for a new owner. Ensure that you back up important data, check cartridge levels, and be prepared to reconfigure network settings if required.
For model-specific instructions, consult your printer’s user manual. By following these steps, your Brother printer will be returned to its original state, ready to provide reliable and efficient printing once again.
How to Connect Your Brother Printer to Wi-Fi: A Comprehensive Guide
Brother printers are renowned for their reliability and quality, but like any technology, they can encounter issues from time to time. This comprehensive guide will walk you through various troubleshooting steps to resolve common problems with Brother printers.
Having your Brother printer connected to Wi-Fi allows for convenient and wireless printing from various devices. This comprehensive guide will walk you through different methods to connect your Brother printer to Wi-Fi, ensuring a seamless printing experience.
1. Prerequisites
Before you start, ensure you have the following:
- A Brother printer compatible with wireless connectivity.
- A Wi-Fi network with a working internet connection.
- Network name (SSID) and password.
- A computer, smartphone, or tablet with Wi-Fi capability.
2. Method 1: Wi-Fi Direct
Wi-Fi Direct allows you to connect your printer directly to your device. Here’s how:
- On your printer, press the Wi-Fi Direct button (may also be labeled “WPS” or “Direct”).
- On your device, go to Wi-Fi settings, find your printer in the available networks, and connect to it.
- Follow the on-screen prompts to complete the setup.
3. Method 2: WPS (Wi-Fi Protected Setup)
If your router supports WPS, you can connect your printer easily:
- On your Brother printer, press the WPS button.
- Within 2 minutes, press the WPS button on your router.
- Your printer should connect to the Wi-Fi network.
4. Method 3: Using the Control Panel
Most Brother printers allow you to set up Wi-Fi using the control panel. Here’s a general process:
- Press the “Menu” button on your printer’s control panel.
- Navigate to “Network” or “WLAN” settings.
- Select “Setup Wizard” or “WPS.”
- Follow the on-screen instructions to connect to your Wi-Fi network.
5. Method 4: Using the Brother iPrint&Scan App
If you have a smartphone or tablet, you can use the Brother iPrint&Scan app:
- Download and install the Brother iPrint&Scan app on your mobile device.
- Open the app and tap “Printer” in the bottom menu.
- Choose your Brother printer and tap “Connect.”
- Follow the prompts to enter your Wi-Fi details and connect your printer.
6. Method 5: Manually Entering Wi-Fi Settings
For more advanced users, you can manually enter Wi-Fi settings:
- On your printer, go to the control panel and navigate to “Network” or “WLAN” settings.
- Select “Manual Setup” and enter your SSID and password.
- Follow the on-screen prompts to complete the setup.
Connecting your Brother printer to Wi-Fi provides the flexibility to print from various devices without the need for wired connections. Whether you prefer the simplicity of WPS, the convenience of a mobile app, or manual setup, you now have a variety of methods to choose from. By following the steps outlined in this guide, you’ll be able to enjoy wireless printing with your Brother printer in no time.
If your Brother printer is unable to connect to Wi-Fi, it can be frustrating, but there are several troubleshooting steps you can follow to resolve the issue. Here’s a guide on how to fix a Brother printer that can’t connect to Wi-Fi:
1. Check the Basics:
- Ensure your printer is within the range of your Wi-Fi network.
- Verify that your Wi-Fi network is working correctly and that other devices can connect to it.
2. Restart Your Devices:
- Turn off your printer and the router.
- Unplug the router from the power source and wait for about 30 seconds.
- Plug the router back in and let it boot up completely.
- Turn on your printer and attempt to reconnect to Wi-Fi.
3. Double-Check Network Credentials:
- Make sure you are entering the correct SSID (network name) and Wi-Fi password on your printer.
- Check for typos and ensure the password is correct.
4. Reconnect Using WPS (Wi-Fi Protected Setup):
- If your router supports WPS, try using it to establish the connection.
- Press the WPS button on your router and then the WPS button on your Brother printer (if available).
5. Disable MAC Address Filtering:
- Some routers use MAC address filtering to control access. Check if your router is set to filter devices by their MAC addresses. If so, you may need to add your printer’s MAC address to the allowed list.
6. Update Printer Firmware:
- Outdated firmware can sometimes cause connectivity issues. Visit the Brother website and check for firmware updates specific to your printer model.
7. Perform a Factory Reset:
- As a last resort, you can perform a factory reset on your Brother printer. Please note that this will erase all custom settings and configurations. Consult your printer’s manual for instructions on how to reset it to factory defaults.
8. Contact Brother Support:
- If you’ve tried all the above steps and your printer still cannot connect to Wi-Fi, it may be a hardware or software issue. Contact Brother’s customer support for further assistance. They can provide specialized guidance for your specific printer model.
Remember that it’s essential to be patient and methodical when troubleshooting Wi-Fi connectivity issues. Start with the basic steps and work your way up to more advanced solutions. In most cases, one of these steps should help you fix the problem and Connect Brother printer to Wi-Fi successfully.
Get Other related top article information on this website