Installing murals wallpaper can transform your space and add a unique touch to your home decor. Whether you’re looking to create a stunning accent wall or bring the outdoors indoors, this DIY guide will walk you through the steps to successfully install murals wallpaper. Remember to carefully follow the manufacturer’s instructions that come with your specific wallpaper, as they might have slight variations. Let’s get started!

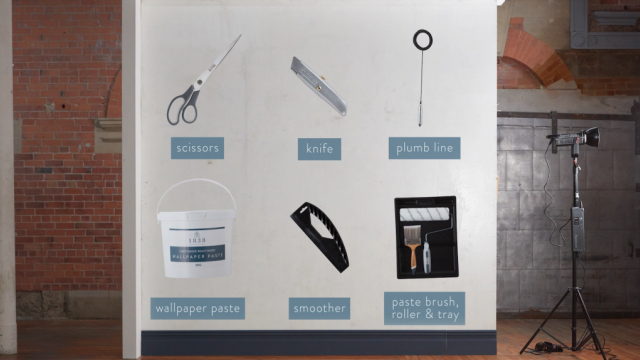
Materials Needed:
- Murals wallpaper
- Measuring tape
- Level
- Pencil
- Wallpaper adhesive/paste
- Wallpaper brush or smoothing tool
- Utility knife or wallpaper cutter
- Sponge or damp cloth
- Drop cloth or plastic sheeting
- Step ladder (if needed)
Step-by-Step Installation Guide:
Step 1: Prepare the Wall
Clear the wall:
Remove any existing wallpaper, nails, or debris from the wall. Ensure the surface is clean, smooth, and dry.
Step 2: Measure and Cut
Measure the wall:
Measure the height and width of the wall where you’ll be installing the mural. Add a few inches to each measurement to allow for adjustments and trimming. 2.2 Cut the mural panels: Using the measurements, cut the mural into manageable panels, making sure the design lines up correctly.
Step 3: Apply Adhesive
Mix adhesive:
Prepare the wallpaper adhesive or paste according to the manufacturer’s instructions. 3.2 Apply adhesive to the wall: Starting from the top, use a paint roller or brush to apply the adhesive to the wall in a generous and even coat. Work in sections that are slightly wider than the width of each mural panel.
Step 4: Hang the Mural Panels
Align the first panel:
Carefully position the first mural panel at the top of the wall, leaving a slight overlap at the ceiling and edges. 4.2 Smooth out the panel: Gently use a wallpaper brush or smoothing tool to press the panel onto the adhesive, working from the center outwards to remove any air bubbles. 4.3 Continue with the next panels: Align and apply the remaining panels, ensuring the design matches seamlessly. Use the level to make sure each panel is vertically straight.
Step 5: Trim Excess
Trim the edges:
Once all panels are in place, use a utility knife or wallpaper cutter to trim the excess material at the top, bottom, and sides. Be precise but gentle to avoid damaging the underlying wall.
Step 6: Finishing Touches
Smooth out bubbles:
Carefully go over the entire mural with a wallpaper brush or smoothing tool to ensure there are no remaining air bubbles or wrinkles. 6.2 Clean excess adhesive: Use a damp sponge or cloth to wipe off any excess adhesive from the mural surface.
Step 7: Allow to Dry
Let it dry: Allow the mural to dry completely according to the adhesive manufacturer’s instructions. This is typically 24 hours.
Step 8: Enjoy Your New Mural
Step back and admire:
Once the mural is dry, step back and enjoy your newly transformed space. The mural should be securely adhered to the wall and ready to impress!
Conclusion:
Installing murals wallpaper can be a rewarding DIY project that adds a stunning focal point to any room. By following these step-by-step instructions and taking your time, you can achieve a professional-looking installation. Remember to consult the specific guidelines provided by the mural manufacturer for any unique considerations. With your new mural in place, your space will have a whole new dimension of beauty and creativity.
DIY Guide: How to Install Murals Wallpaper FAQ
Q1: Do I need any special skills to install murals wallpaper?
A1: No special skills are required, but basic DIY experience and attention to detail will be beneficial. Following the manufacturer’s instructions and taking your time will help ensure a successful installation.
Q2: Can I install murals wallpaper on any type of wall?
A2: Murals wallpaper can be installed on most wall surfaces, including drywall, plaster, and even some textured walls. However, it’s best to avoid extremely textured surfaces, as they might not provide a smooth enough base for the wallpaper.
Q3: Do I need to prepare the wall before installing the wallpaper?
A3: Yes, preparation is important. Make sure the wall is clean, smooth, and dry. Remove any existing wallpaper, nails, or debris. If the wall has imperfections, consider filling and sanding them before applying the wallpaper.
Q4: Can I install murals wallpaper in a humid room like a bathroom?
A4: While some murals wallpapers are designed to handle moisture, it’s generally recommended to avoid installing wallpaper in areas with high humidity, as it could potentially cause the adhesive to weaken over time.
Q5: What tools do I need for the installation?
A5: You’ll need measuring tape, a level, a pencil, wallpaper adhesive or paste, a wallpaper brush or smoothing tool, a utility knife or wallpaper cutter, a sponge or damp cloth, and a step ladder if needed.
Q6: Can I install the mural by myself, or do I need assistance?
A6: You can install the mural by yourself, but having an extra pair of hands can be helpful, especially when aligning and positioning larger panels.
Q7: How do I match the design across multiple mural panels?
A7: Each panel should have a slight overlap to allow for adjustments. Match the design by aligning the patterns at the edges of each panel, ensuring a seamless transition.
Q8: Can I reposition the mural panels if I make a mistake during installation?
A8: Yes, you can gently reposition the panels if needed, especially before the adhesive dries. Take care not to stretch or damage the wallpaper during this process.
Q9: What should I do if I encounter air bubbles or wrinkles while applying the mural?
A9: Use a wallpaper brush or smoothing tool to gently press out the air bubbles or wrinkles from the center toward the edges. Start from the top and work your way down.
Q10: How long does the adhesive take to dry?
A10: The drying time depends on the adhesive or paste you’re using. Refer to the manufacturer’s instructions for the specific drying time, but it’s typically around 24 hours.
Q11: Can I clean the mural after installation? A11: Yes, you can gently clean the mural with a damp cloth or sponge if needed. Avoid using harsh chemicals or abrasive materials that could damage the wallpaper.
Q12: Can I remove the murals wallpaper later without damaging the wall? A12: Most murals wallpapers are designed to be removable without causing damage to the wall. Follow the manufacturer’s instructions for proper removal techniques.
Q13: Can I install murals wallpaper over existing wallpaper? A13: It’s generally not recommended to install wallpaper over existing wallpaper, as it can lead to an uneven surface and may not adhere properly. It’s best to remove the existing wallpaper before installing the murals wallpaper.
Remember, every murals wallpaper installation might have unique considerations, so always refer to the specific instructions provided by the manufacturer to achieve the best results.